**This is an old revision of the document!**
Howto "VOC-Verantwortlicher"
Die Aufgabe der Rolle “VOC-Verantwortlicher” bei kleinen Veranstaltungen (alles unter vier Räume) ist die Koordination des VOC Einsatzes. Dazu gehört die Kommunikation zwischen VOC und dem Veranstalter, klären der Logistik, Motivation von Helfern usw.
Vor der Veranstaltung
Der Veranstalter meldet sich bei uns (in der Regel per Mail auf voc@). Wenn du die Veranstaltung interessant findest und Hardware im Zeitraum verfügbar ist, sorgst du dafür das die Anfrage auch im Wiki und auf video@ landet. Wenn sich genügend Mitstreiter gefunden und die Anforderungen erfüllt werden können, setzt du den Status im Wiki auf confirmed.
Als Gedächtnisstütze für die einzelnen Punkte gibt es auf checkliste eine Vorlage, die du auf der Veranstaltungswikiseite einbinden und Stück für Stück abhaken oder mit Details erweitern kannst. Beispiel: FOSSGIS 2017.
Logistik: Schau auf Events without Chaosradio and Datengarten nach, wo welche Cases vor und nach deiner Veranstaltung sind. Stimme dich mit den VOC Verantwortlichen dieser Veranstaltungen per IRC in #voc ab. Falls du selbst die Spedition beauftragen musst schau auf Logistics HowTo wie das geht.
Kickoff-Meeting per Mumble
- Aufteilung Cases auf Räume festlegen und in Wikiseite festhalten
- Schedule Quelle abfragen ggf. selbst erzeugen
Streaming Webseite anpassen
media.ccc.de: Ordner auf koeln.media von danimo, derpeter oder meise anlegen lassen.
CM Repo lokal auf deinem Rechner clonen
Stelle sicher das du
- die Passwörter für den Raum-OpenWRT, -Switch und ??? hast – z.B. durch Zugriff auf die VOC Passwortdatenbank. Außerdem benötigst du
- einen VNC Client (für Fernzugriff Mixer Laptops) [Linux: ???, Mac OS: Chicken VNC],
- eines der Schnittprogramme: Shotcut oder Kdenlive und
- VLC auf deinem eigenem Rechner.
- [SSH public Key im cm + gitolite-admin Repo vorhanden?]
- [SSH Zugriff auf live.ber möglich?]
Tracker
Im c3tracker Projekt anlegen und schedule.xml importieren
- Bestehendes Tracker Projekt kopieren oder Neues anlegen und Project Properties von Hand übertragen
- Worker kontrollieren bzw. alle Hacken rausnehmen
- Tickets via schedule.xml importieren
- Meta Tickets per Massen-Edit via Suche von
stagingaufstagedstellen
Entsprechender Abschnitt aus der C3 Tracker Doku:
Project setup
- Create tracker project (you can also clone a matching project to have prefilled properties)
- Import schedule.xml
- Set all master tickets from staging to staged via mass-edit
- Adjust project properties, recommendations: (full reference at the bottom of the page)
- Compare project properties with previous instalment of the same event
optimal properties from current project
Meta.Acronym                    camp2023
Meta.Album                      Chaos Communication Camp 2023
Meta.License                    Licensed to the public under http://creativecommons.org/licenses/by/4.0
Meta.Year                       2023

Processing.Auphonic.Enable      no
Processing.BasePath             /video/
Processing.MasterMe.Enable      yes
Processing.Path.Intros          /video/intros/camp2023
Processing.Path.Outro           /video/intros/camp2023/outro.ts

Publishing.Path                 /video/encoded/camp2023/
Publishing.Upload.SkipSlaves    speedy,tweety,blade1,blade2,blade3,blade4
Publishing.UploadTarget         upload@releasing.c3voc.de:/video/encoded/camp2023/
Publishing.Voctoweb.Enable      yes
Publishing.Voctoweb.Path        /cdn.media.ccc.de/events/camp2023
Publishing.Voctoweb.Slug        camp2023
Publishing.Voctoweb.Tags 	<additional tags>
Publishing.Voctoweb.Thumbpath   /static.media.ccc.de/conferences/camp2023
Publishing.YouTube.Category     27
Publishing.YouTube.Enable       yes
Publishing.YouTube.Playlists    <meep>
Publishing.YouTube.Privacy      <one of: public, unlisted, private>
Publishing.YouTube.Tags         <additional tags>
Publishing.YouTube.Token        <meep>

Record.Container                TS
Record.EndPadding               300
Record.Slides                   yes
Record.StartPadding             300
Worker Filter Examples
EncodingProfile.IsMaster=no
EncodingProfile.IsMaster=yes
EncodingProfile.IsMaster=
Fahrplan.Room=Servus.at Lab
Please note that the conditions in the “project to worker group” filter are currently evaluated with logical OR.
Specifying a property with an empty value, which is often done for EncodingProfile.IsMaster, will match if this property does not exist at all on a ticket. So for EncodingProfile.IsMaster, specifying an empty filter will match on recording tickets which never have this property.
Versicherung
Wie in den oben verlinkten Anforderungen aufgeführt, muss der Veranstalter für eventuelle Beschädigungen oder Verlust der Hardware für die Dauer des Events mit An- und Abtransport aufkommen. Dies wir in der in Regel über eine Event-Versicherung abgedeckt – die der Veranstalter meistens ohnehin schon hat. Der Wiederbeschaffungswert beträgt ca. 10k EUR pro Raum/Case. Ansonsten kann der Veranstalter z.B. über http://www.schwandt-makler.de/ auch eine Equipment-Versicherung abschließen – diese kostet meistens zwischen 100-150 EUR; mit einer Selbstbeteiligung von 250 EUR. (siehe auch https://c3voc.de/wiki/eventhowto#anlieferung_versicherung )
Oft wird dafür eine Liste mit Seriennummern der Hardware benötigt – diese erstellst du am einfachsten wie folgt:
- Öffne die Datei
seriennummern.odsaus dem Git-Repo “seriennummern” mit Libre Office o.ä. - Stelle den Filter von Spalte E 'Case' über das Dreieck unten rechts so ein dass nur noch die Cases angezeigt werden, die du dabei hast. Setze also z.B. die Checkboxen von S5, S6, A1 und A2.
- Markiere die Spalten A bis F und kopiere sie in ein neues leeres Sheet. Dadurch sind wirklich nur noch die Daten in der Datei die du brauchst.
- Wenn du Lust hast kannst du Spalte E 'Case' jetzt entfernen und eventuelle gelbe Felder wieder weiß einfärben.
- Neue Summenzeile unten anfügen, und die Wiederbeschaffungswerte per Formel aufsummieren
- Insbesondere wenn du verschiedene Eigentümer in der Liste hast, kopiere dir die entsprechenden Adressen aus dem Tab 'Eigentümer' des
seriennummern.ods. - Verschicke die neu erstelle Datei an den Veranstalter als XLS oder ODS; oder c&p die finale Tabelle in eine HTML-Mail.
Alternativ kann man auch in https://c3voc.de/wink/items/export ein passendes CSV erzeugen, und das dann ggf. nochmal von Hand an das gewünschte Format anpassen.
Intros und Outros
TBD
vgl. https://c3voc.de/wiki/projects:intro-outro-generator bzw. https://github.com/voc/intro-outro-generator#frab-based-into--and-outro-generator
Aufbau
Orga vor Ort kennenlernen: Wer ist wirklich unsere primärer Kontakt, wer ist Haupt-Orga, wer ist für was zuständig?
Räumliche Verteilung
Ein Vortragssaal vs mehrere Räume mit extra VOC Büro.

Hardware im Saal aufbauen
Die unten benannte Liste spiegelt nicht die aktuelle Case-Ausstattung wieder. Es sind deutlich mehr Kabel vorhanden als aufgelistet.
Zuerst Kamera Position festlegen, z.B. mit Akku, Constraints:
- Sofern du keine SDI Kabeltrommel mit bestellt hast, gibt es maximal 10+3+40m Koax-Kabel. Sprich mehr Abstand zwischen Encoder PCs und Kamera sind nicht möglich.
- Sofern du HDMI via Tronsmart abgreifen willst, und diesen für möglichst geringe Latenz nicht per Ethernet sondern per HDMI an den Encoder Cube anbinden willst, hast du nur ca. 5m HDMI Kabel dabei. Inzwischen haben wir auch Wandler von HDMI auf SDI mit im Case, wodurch du auch dort auch auf die Koax-Kabel von oben zurückgreifen kannst.
- Strom bzw. Verfügbarkeit von Schuko-Verlängerungskabel
- Audio aka Wo kommt der Ton her? Im Case sind ca. 32m XLR Kabel.
- Sofern der Aufbau von einer einzelnen Person bedient werden soll, sollten Kamera und Mischer-Notebook zusammen stehen. Das Notebook braucht zwingend eine Ethernetverbindung zum Encoder Cube. Im Case sind 20+15+10+2x5m Ethernetkabel, drei RJ45-Verbinder und zwei Ethernet-Switche. Ein Ethernet Link darf maximal 100m lang sein, ansonsten muss ein Verstärker aka Switch dazwischen.
Open WRT Router konfigurieren
Je nach dem wie der Netzwerkaufbau aussieht musst du einen oder mehrere OpenWRT Boxen aufstellen. Ich gehe hier mal vom Best-Case aus: Sprich alle Vortragssäle und das VOC Büro sind in einem Layer 2 Netz.
VPN Config anpassen: iroute's der Cases vor Ort entsprechend kommentierten bzw. auskommentieren, die openvpn server oder client neu starten und danach schauen ob sich der VPN Client wieder verbindet
 root@mng:/etc/openvpn/clients$ vim wrtX@mng.ber.c3voc.de
 root@mng:/etc/openvpn$ cat openvpn-status.log
Beispiel /etc/openvpn/clients/wrt1@mng.ber.c3voc.de mit Case 1 und 2 hinter WRT1:
ifconfig-push 10.8.1.201 255.255.0.0
iroute 10.73.1.0 255.255.255.0
iroute 10.73.2.0 255.255.255.0
#iroute 10.73.3.0 255.255.255.0
#iroute 10.73.4.0 255.255.255.0
entsprechend sind bei wrt2@… alle iroutes kommentiert, sprich deaktiviert.
Auf dem WRT das Router-Interface aktiveren (dabei kontrollieren ob WAN auch ne IP bekommen hat und richtig konfiguriert ist – normalerweise DHCP) router_ip_vergeben
Rechner per Bundlewrap konfigurieren
Inzwischen solltest du wissen in welchem Raum welches Cases, wo du welche Quellen bzw. Kameras am Cube anschließt. Diese Information muss du nun in der Bundlewrap Config pro Raum eintragen und per SSH deployen:
Für Details siehe Ansible. Hier wieder am Beispiel Case 1 und 2:
git clone git@git.c3voc.de:cm.git
cd bundlewrap
vim nodes/encoder1.toml
vim nodes/encoder2.toml
vim groups/yourevent.toml
bw apply saal1 saal2
Bitte lies auch die README im Repository. Dort findest du weitere Instruktionen und Codebeispiele.
Streaming Relays und Transcoding konfigurieren
Das Streaming System wurde überarbeitet und konfiguriert sich heute in der Regel von selbst, vgl. CDN
Streaming website konfigurieren, comitten, pushen und per ./deploy.sh deployen.
Relive
HLS Relive konfigurieren:
Setting up Relive in the VOC setup
Login to server
ssh relive@relive.c3voc.de
cd git
screen -dR
- Create an appropriate config for your event in
live.alb:/home/relive/git/configs- either by using
./gen_event_config.py <conference slug>, or - manually: copy
cfg.example, look at other files in that directory, or in theold/subdirectory for inspiration. The filename will be used as the conference name from here on.
- After a minute, a cronjob will run and download the schedule, etc. (If you are impatient, you can run
/home/relive/git/scripts/foreach-project.sh /home/relive/git/scripts/get-fahrplan.shmanually) - Start the scheduler (run as user relive, inside of a screen/tmux session):
./launcher.sh <conference slug> - In the streaming-website configuration, set
RELIVE_JSONto point tohttp://relive.c3voc.de/relive/<conference slug>/index.json
Note that the index.json file is also only regenerated periodically, so it might be a minute or two before that URL actually works.
Verschiedenes
live.ber:/srv/releases$ ./create-new-folder.sh <conference-slug>
Setup Tracker Worker + Minion
Entsprechender Abschnitt aus C3 Tracker Doku:
Pipeline setup during event
During event setup of the pipeline, you have to decide if you want leave the MPEG TS snippets only on the recording cubes or also rsync them to a central storage:
Simple: decentralised classic (Variant 2)
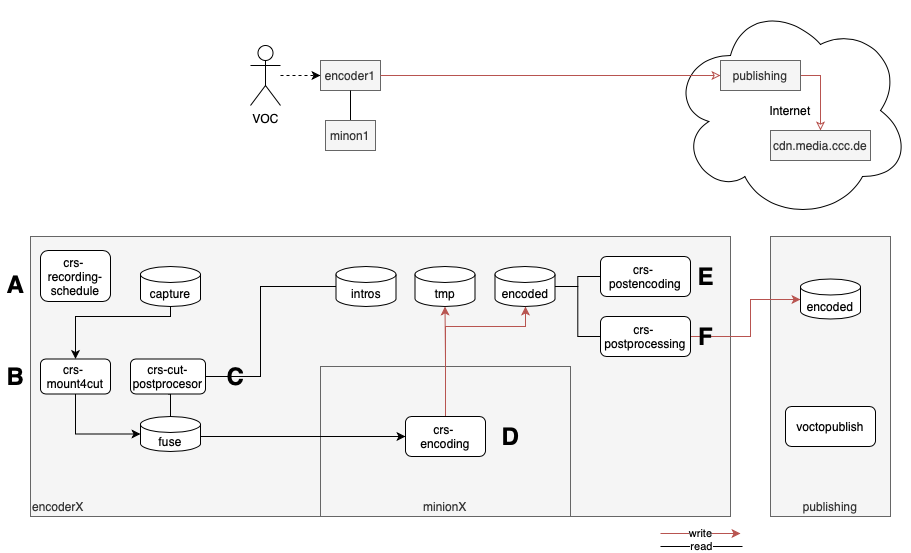
This variant is only practical if you have only one room, or at least one release encoder (aka Minions) for each recording cube. When using this variant with multiple rooms in one Tracker project (like at JEV22), you also have to set room filters in the tracker worker queues.
For every worker:
- set room filters in tracker e.g.
Fahrplan.Room = Foobar
For every recoding cube:
- start tracker worker:
sudo systemctl start crs-worker.target
For each minion:
- mount filesystems from encoder cube:
sudo crs-mount <storage location> - start tracker scripts for encoding:
sudo systemctl start crs-encoding.service
centralised storage (rsync) (Variant 1)

The first variant is typically used for events with more than one room. For bigger events we use the dedicated storage server in the event server rack, for smaller events a USB connected hard drive to one of the minions might be sufficient. Each recording cube exposes the files via rsyncd, which are pulled by an rsync process running inside a screen on the storage pc.
For each encoderX start rsync on the central storage: sudo systemctl start rsync-from-encoder@encoderX.lan.c3voc.de
Then, start tracker workers on storage: sudo systemctl start crs-worker.target (only needed if you don't use storage.lan.c3voc.de - worker scripts get started automatically)
Minion setup
To allow the encoding workers to do their job, they need to mount the storage first: sudo crs-mount <storage location>
After mounting, you can start the tracker encoding workers: sudo systemctl start crs-encoding.service
The minion VMs running inside our event colo case automatically mount storage.lan.c3voc.de via cifs and start their worker scripts. You usually do not need to touch them.
Cube as worker setup
At small events, when the talks are finished for today, you can use the recording cubes to encode master MP4 files.
First: Stop voctocore.
The rest is very similar to above, but with different mounts so /video/capture is not hidden:
- snippet.bash
sudo mount -t cifs -o uid=voc,password= //storage.lan.c3voc.de/fuse /video/fuse
sudo mount -t cifs -o uid=voc,password= //storage.lan.c3voc.de/video/intros /video/intros
sudo mount -t cifs -o uid=voc,password= //storage.lan.c3voc.de/tmp /video/tmp
sudo mount -t cifs -o uid=voc,password= //storage.lan.c3voc.de/encoded /video/encoded
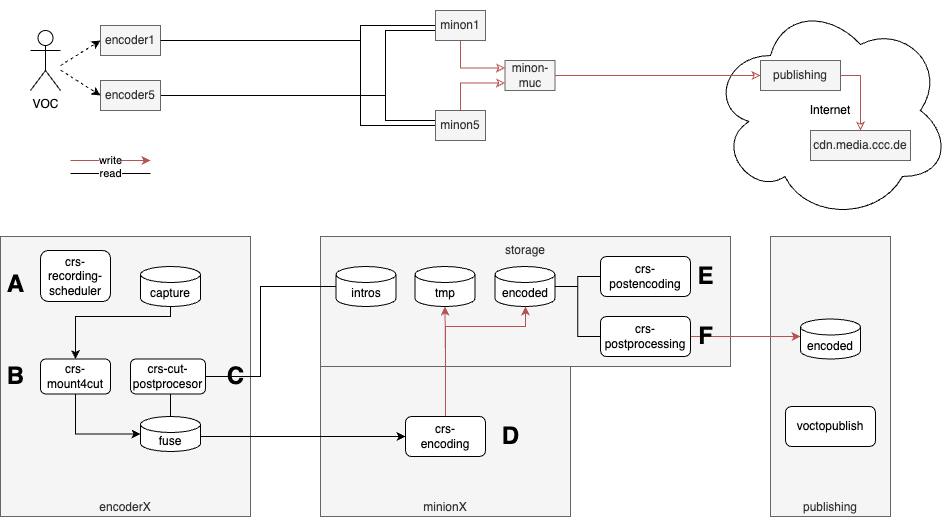
decentralised pipeline (Variant 3)
Attention
The “decentralized pipeline (Variant 3)” should not be used by inexperienced users. Use the information above to find out how to get this variant working, then adjust/improve the documentation here.
Similar to variant 2, but the release encoder (minion) only mounts the /video/fuse/$room/ from each recording cube. The encoded and tmp files life on one minion, the secondary minions mount /video/encoded and /video/tmp from the primary minion. [Reason: It is not guaranteed that the minion which encoded a talk also does the postprocessing (upload) step.]
You have to set the room filters only for the recording cubes, the minions can process talks independently.
- On recording cubes: start systemd units for steps A
crs-recording-scheduler, Bcrs-mount4cut, and Ccrs-cut-postprocessor- On release encoders: start systemd units for steps D
crs-encoding, Ecrs-postencoding, and Fcrs-postprocessing
New example with systemd units and case 1 and 5:
optional: configure 10.73.0.2 (aka storage.lan.c3voc.de) on the master minion as secondary ip
on recording cubes, mount or copy the intros from their source – here storage.lan.c3voc.de
sudo mount -t cifs -o password= {//storage.lan.c3voc.de,}/video/intros
sudo systemctl start crs-recording-scheduler  # A
sudo systemctl start crs-mount4cut            # B
sudo systemctl start crs-cut-postprocessor    # C

# check if everything is running as expected – you might have to disable/stop the other CRS workers D-F
sudo systemctl status -n 0 crs-*
on master minion (in this example storage.lan.c3voc.de)
mkdir -p /video/fuse/jev22/{Ahlam,Bhavani}
mount -t cifs -o password= {//encoder1.lan.c3voc.de,}/video/fuse/jev22/Ahlam
mount -t cifs -o password= {//encoder5.lan.c3voc.de,}/video/fuse/jev22/Bhavani

sudo systemctl start crs-encoding             # D-encoding
sudo systemctl start crs-postencoding         # E-postencoding-auphonic
sudo systemctl start crs-postprocessing       # F-postprocessing-upload

# check if everything is running as expected – you might have to disable/stop the other CRS workers A-C
sudo systemctl status -n 0 crs-*
(ensure that samba is installed on this master minion aka storage)
on other minions
mkdir -p /video/fuse/jev22/{Ahlam,Bhavani}
mount -t cifs -o uid=voc,password= {//encoder1.lan.c3voc.de,}/video/fuse/jev22/Ahlam
mount -t cifs -o uid=voc,password= {//encoder5.lan.c3voc.de,}/video/fuse/jev22/Bhavani
mount -t cifs //storage.lan.c3voc.de/encoded /video/encoded
mount -t cifs -o password= //storage.lan.c3voc.de/encoded /video/encoded
mount -t cifs -o password= //storage.lan.c3voc.de/tmp /video/tmp
mount -t cifs -o password= {//storage.lan.c3voc.de,}/video/intros
Old example with custom screenrc and case 5 and 6:
on recording cube, without intros either copy or mount the intros from their source
sudo mount -t cifs -o password= {//storage.lan.c3voc.de,}/video/intros
cd /opt/crs/tools/tracker3.0/
sudo ./start screenrc-pipeline # with steps A, B and C
on master minion (in this example minion5)
mount -t cifs -o password= //encoder5.lan.c3voc.de/video/fuse/podstock2019/Aussenbuehne /video/fuse/podstock2019/Aussenbuehne
mount -t cifs -o password= //encoder6.lan.c3voc.de/video/fuse/podstock2019/Innenbuehne /video/fuse/podstock2019/Innenbuehne
mount -t cifs -o password= //encoder6.lan.c3voc.de/video/intros /video/intros
cd /opt/crs/tools/tracker3.0/
sudo ./start screenrc-pipeline # with steps D, E, F
(ensure that samba is installed on this master minion)
on other minions
mount -t cifs -o password= {//encoder5.lan.c3voc.de,}/video/fuse/podstock2019/Aussenbuehne
mount -t cifs -o password= {//encoder6.lan.c3voc.de,}/video/fuse/podstock2019/Innenbuehne
mount -t cifs //storage.lan.c3voc.de/encoded /video/encoded
mount -t cifs -o password= //storage.lan.c3voc.de/encoded /video/encoded
mount -t cifs -o password= //storage.lan.c3voc.de/tmp /video/tmp
mount -t cifs -o password= {//storage.lan.c3voc.de,}/video/intros
cd /opt/crs/tools/tracker3.0/
sudo ./start screenrc-encoding-only # only step E
Betrieb
TODO
- Festplattenplatz prüfen
- Recording nachts anhalten und morgens (automatisch) wieder starten
- Während der Vorträge: Siehe HowTo: A/V Technican
- etc